Showing posts with label configuration. Show all posts

22 Aug 2013

Turn on the Developer tab in MS Office applications

Word, Excel, Powerpoint, Outlook, etc, have some additional features available on the Developer tab (ribbon bar). This tab is not turned on by default. Follow these steps to turn it on:

Click File | Options 
Click Customize Ribbon

Word 2010 Developer tab

On the right look through the list of Main Tabs and click to enable Developer (as shown above).
Click OK

If you are using Word you'll see the following:


It's similar for Outlook, Excel, PowerPoint and other MS Office applications.


NOTE: This applies to MS Office 2010 and 2013.

13 Apr 2013

Crunchbang Linux - add a menu option

If you install a new application on Crunchbang you may want to add a shortcut to the menu. In a previous article I wrote about installing Asunder, the audio CD ripping application. As an example I'll explain here how to add Asunder to the Multimedia menu:


Instructions


Right click on the desktop

Click Settings | Openbox | GUI Menu Editor


Click the arrow next to Openbox 3

Scroll down and find Multimedia


Click the arrow next to Multimedia 

Click once to select VLC Media Player (or one of the other items under Multimedia)

Click New Item 


A place holder is created (where it says "New item" under Multimedia above)


Label: This is the name of the shortcut
Id: Leave this blank
Action: Execute
Execute: This is the folder and name of the program to run


In our example we'll call our label Asunder (see above)

For the execute command, either type it in or browse using the [...] button. In our example Asunder can be found at /usr/bin/asunder

Click File | Save

Click File | Quit


Result
Now when you want to start Asunder do the following:
Right click on the desktop
Click Multimedia | Asunder


Understanding
Crunchbang uses the Openbox desktop interface. This is a simple yet powerful system. As with most configuration in Linux the menu configuration is stored in a text file. So above where we used the GUI Menu Editor, that wrote the changes to a file. This is great because if you redesigned the menu structure to your liking you could save the configuration file. Later if you wanted to reuse the same menu structure on another computer, you could by copying your configuration file - simple!

To understand this more, on the desktop right click, click Settings | Edit menu.xml


Above in the editor can you see the Multimedia menu and Asunder? What you entered in the GUI Menu Editor appears here in menu.xml.

In the window at the bottom of the Geany text editor you can see the path, the folder where the menu.xml is stored: /home/michael/.config/openbox/
Of course on your computer it won't be "michael" but whatever your username is.


Conclusion
Again another simple yet powerful Crunchbang feature.


11 Apr 2013

Crunchbang Linux - Rip audio CDs

One use for a Crunchbang Linux computer maybe to store audio (mp3) files. Perhaps you've always meant to rip your CD collection into digital files? Here's a brief look at installing and using one CD ripping program.


Asunder
I found that Asunder is a simple yet powerful program with a graphical interface that will, when you insert an audio CD, download the album and track titles for you. When you start ripping it will  create the music (mp3) files in a folder structure for you automatically. You can also change how it does this and where it stores the audio files using the Preferences menu. Asunder will save in WAV, MP3 or OGG format.


Install Asunder
Right click on the Crunchbang desktop

Click Terminal

At the $ prompt type:
sudo apt-get install asunder   [Enter]


Using Asunder
To start Asunder type: asunder [Enter]

The Asunder interface is refreshingly simple. Insert an Audio CD and it automatically checks the internet for the name of the album, artist, genre, etc. The following is an example - I've blurred the artist, title and track names but of course you will see them in all their glory:


The default setting is to save to OGG files.

If you want to change this or other settings click the Preferences button.

Click the Encode tab...


You can change to MP3 as shown above.

NOTE: OGG is a compressed audio file format, it's similar to MP3, you might get smaller files if you use it. However, if you want to copy your music to an MP3 player, very few support OGG but nearly all support MP3.

The General tab is where Asunder will save your audio files, by default to your home folder. The Filenames folder let's you decide the names of the artist and album folder names. The default is fine for most purposes.

When you are finished changing preferences click OK to save and close this window.

On the main Asunder screen bottom right click the Rip button to start ripping (saving) tracks.


Conclusion
The nice thing about Asunder is that it's simple, it does just what it is supposed to. There isn't a music player or any other fancy feature, it is what it is. If you want to rip one CD after another, this could well be the solution.


References

Asunder
http://www.littlesvr.ca/asunder/downloads.php

OGG file format
http://en.wikipedia.org/wiki/Ogg_file

MP3 file format
http://en.wikipedia.org/wiki/Mp3

3 Apr 2013

Crunchbang Linux - remote desktop

If you are using a Linux computer as file storage when it's in another room or headless (without a monitor) it would be good to remotely control the Linux desktop from your Windows computer. You could use Putty as explained in a previous article. However Putty only gives access to the remote Linux computer's command prompt, not to the desktop.

This article explains the basics of setting up Vino, it's a service on Crunchbang that'll allow for remote connections from a Windows computer (and other computers too). On the Windows side we can use a VNC client, more about this later...


Install Vino on Crunchbang Linux
Right click on the desktop

Click Terminal

At the $ prompt type:
sudo apt-get install vino  [Enter]

When it has finished type the following:
vino-preferences  [Enter]


At the top of the window it explains the 'Sharing' information - here you can see how you will be able to connect to your remote desktop. It's always the host name of your Crunchbang Linux computer with .local at the end. In my case it'll be crunchbangT42.local

Security is important but your level will depend on your circumstances. Don't choose 'You must confirm each access to this machine' because that will mean every time you connect to the Crunchbang remotely you'll need to physically go to it and press Enter to accept the remote connection. I do recommend you set a password, that way every time you connect you must enter this password. It will stop anyone else on your network connecting. 

When you've finished click Close


To make Vino start automatically every time you restart Crunchbang, do the following:

Right click on the Crunchbang desktop

Click Settings 

Click Openbox

Click Edit autostart


Scroll to the bottom and add the following:
# Start Vino
/usr/lib/vino/vino-server &

Save and exit the text editor.

The Linux side of the configuration is complete.


UltraVNC Viewer for Windows
Vino is compatible with VNC - in other words, you can use any VNC compatible program to access your Crunchbang Linux computer. I decided to use UltraVNC. It's a nice simple program and there's even a portable version available. In our example here, this is what we'll install:

From your Windows computer, click here and click the download button:
http://portableapps.com/node/2031

Once it has finished download run the exe file, it will extract the files.

Copy the UltraVNCViewer Portable folder to a USB flash drive, your desktop or wherever you want to store it.

Using Windows Explorer browse inside the folder and double click UltraVNCViewerPortable.exe


Enter the host name and .local at then end - in my example I've entered crunchbangT42.local

Click Connect

Enter the password you specified before (in vino-preferences) and click Log On

You'll see your Crunchbang Linux desktop!


References

Help on Crunchbang's website:
http://crunchbang.org/forums/viewtopic.php?id=362

UltraVNC Portable
http://portableapps.com/node/2031

UltraVNC Wikipedia page
http://en.wikipedia.org/wiki/UltraVNC

TightVNC
http://www.tightvnc.com/


2 Apr 2013

Crunchbang Linux - connect with SSH

SSH allows you to connect from a Windows computer to a Linux computer. This is useful for administration, it means you can access the Linux computer without having to go to it physically. You can have access to the command prompt and transfer files to/from it (for administration or for other purposes). SSH is very quick to set up, in this article I'll run through the basics and a couple of essential Windows utilities you'll need.


Install SSH on Crunchbang Linux
Right click on the desktop

Click Terminal

At the $ prompt type:
sudo apt-get install openssh-server   [Enter]

Yes that's it on the Linux side! You can now connect with SSH clients. This is just basic functionality, for more details please see the Crunchbang how-to page: http://crunchbanglinux.org/wiki/howto/ssh


Windows Utilities
To access the command prompt of Linux on your Windows computer, use Putty.
To access the files of the Linux computer use WinSCP.


Putty
Putty is a small exe program that runs on your Windows computer. It allows you to connect via SSH (Secure Shell) to a Linux computer and enter commands at the $ prompt.

On your Windows computer download Putty.exe from:

Double click the Putty.exe file.
In the Hostname box enter the host name of your Crunchbang Linux computer. You can find the host name on the Crunchbang desktop, see below:


Putty will ask you for your Crunchbang login and password. That's it! 


WinSCP
You can download from FTP, SFTP, SSH and more using WinSCP. It's an excellent free utility that if you don't already use it, you'll wonder how you did without it! It can even be driven from the Windows command line. For accessing Linux it is useful for accessing files.

Download WinSCP from here:
http://winscp.net/
There is an installable version and also a handy portable exe you can store on a USB flash drive.

Double click the WinSCP icon
Click New
Enter the hostname (see above)
Enter your Crunchbang Linux username and password
Click Login

That's it! You'll connect to the Linux computer.

NOTE: You can use WinSCP to copy files to/from your Linux computer. However, using SSH it is slow. Instead, if you have a lot of files to copy, I'd recommend using Samba.


References

1 Apr 2013

Crunchbang Linux - simple file sharing with Samba

Crunchbang Linux is a slim down operating system that works well on older computers. I wrote a previous article about it and how I installed it on an old IBM T42 (with just 512MB RAM!) and a little Asus Eee PC. Crunchbang is great for browsing the web and other light work. Another thing you could do is set up file sharing on your Crunchbang computer. This is especially useful if you have an old desktop with a reasonably sized hard disk. You could use it to share files on your home network or you could use it to store files as a backup.

In this article I'll explain how to set up a simple file share on your Crunchbang computer. We'll use Samba which is the most popular file sharing software for Linux. The commands used here can be used in other Linux operating systems too. I will not go into detail and will explain only the basic steps to get simple file sharing working.

At the end, from your Windows computer you'll be able to browse to and save/open files on your Crunchbang Linux computer.


Crunchbang Linux
To download and install Crunchbang please see my previous article:
http://mgxp.blogspot.ch/2013/03/crunchbang-linux.html


Install Samba
Go to your Crunchbang Linux computer, start it and login as usual.
Right click on the desktop and click Terminal

At the $ prompt type:
sudo apt-get install samba libpam-smbpass [Enter]

Samba will download and install. It will ask you for the name of the network workgroup:


Unless you've changed it, accept the default "WORKGROUP".


Configure File Sharing
Change to the srv folder, type:
cd /srv  [Enter]


Create a new folder called share:
sudo mkdir share
  [Enter]


This sets the permissions for the share folder to full read/write:
sudo chmod 777 share/ 
[Enter]


Make a backup copy of the original Samba configuration file, this is just in case you need it for future reference:
sudo cp /etc/samba/smb.conf /etc/samba/smb.conf.original  [Enter]


Edit the Samba configuration file:
sudo geany /etc/samba/smb.conf  [Enter]

The Geany text editor will open the smb.conf file. Replace all the content of the file with the following:

[global]
disable netbios = no
workgroup = workgroup
server string = fileserver
dns proxy = no
log file = /var/log/samba/log.%m
max log size = 1000
syslog = 0
panic action = /usr/share/samba/panic-action %d
obey pam restrictions = yes
unix password sync = yes
passwd program = /usr/bin/passwd %u
passwd chat = *Enter\snew\s*\spassword:* %n\n *Retype\snew\s*\spassword:* %n\n *password\supdated\ssuccessfully* .
pam password change = yes
map to guest = bad user
usershare allow guests = yes
security = user
username map = /etc/samba/smbusers
load printers = no
printing = bsd
printcap name = /dev/null
disable spoolss = yes

[share]
path = /srv/share
writeable = yes
browseable = yes
create mask = 6777
directory mask = 6777


NOTE:

  • The "workgroup=" parameter is set to "workgroup", this is the default name of the Windows network you are connecting to. If your workgroup name is different, change it here.
  • The "server string=" parameter can be anything. It should be something descriptive for this computer. If there are two Linux computers configured with the same "server string=" name, one of them will not appear when you look for it from your Windows computer. Therefore, make sure the "server string=" name is unique on your network.


Save and exit the text editor (Geany).

At the $ prompt enter the following to restart Samba:
sudo /etc/init.d/samba restart  [Enter]

Wait for 30 seconds.


On the Windows computer
Go to your Windows computer, browse in Windows Explorer to your Network, browse under Microsoft Windows Network and Workgroup - you should see your Crunchbang computer appear in the list.


In the above example from a Windows XP computer you can see I've found my Crunchbang computer. In brackets you can see it says "Crunchbangt42" - this is the host name of my Crunchbang computer, yours will be different. you can find the host name on your Crunchbang desktop:


On your Windows computer, if you can't find the Crunchbang computer on the network, on the Windows Explorer address bar you can type \\ and the host name directly. In my case I would enter "\\crunchbangT42".

If you are using Windows 7 click Start and enter \\ and the name of the host in the search box. Click on it...

In Windows when you click the share folder you'll be prompted to login:

This is a Windows XP connect box but you will see something
similar for Windows 7 or any other  version of Windows.

Enter your Crunchbang username, password and click OK. If you want this Windows computer not to prompt you for a password next time, click the [ ] Remember my password box.


The above is the result. You can copy files to/from this location.

Finished!


References

The following Youtube video shows in more depth how to set up Samba. My thanks to the author as it what I used as a starting point for this article.
http://youtu.be/P7lvuJdsrMY

Samba
http://www.samba.org/

Crunchbang
http://crunchbang.org/


Crunchbang Linux - change the keyboard layout

When I installed Crunchbang on my Asus Eee PC I made a mistake and selected the UK keyboard layout. I have the US layout. Now how to change the keyboard layout?

Right click on the desktop

Click Terminal

At the $ prompt type:
sudo geany /etc/default/keyboard   [Enter]

The Geany text editor will pop up, look for the following:

XKBMODEL="pc105"
XKBLAYOUT="us"
XKBVARIANT=""
XKBOPTIONS=""

Change XKBLAYOUT= to what you want. In my case I changed from XKBLAYOUT="uk" to XKBLAYOUT="us".

Save and exit Geany.

Restart Crunchbang for the change to take effect.


Reference
http://crunchbang.org/forums/viewtopic.php?id=1103


Crunchbang Linux - change the time zone

If your Crunchbang Linux has the wrong time, perhaps you have the wrong time zone set? To change time zone do the following:

Right click on the desktop

Click Terminal

At the $ prompt type:
sudo dpkg-reconfigure tzdata  [Enter]

A menu will appear:


The mouse doesn't work, navigate using the keyboard arrow keys and Enter to select. In the above, press Enter on your region.


Select the city closest to you

Finished!


Reference
http://wiki.debian.org/TimeZoneChanges

19 Mar 2013

Word 2010 printing is very slow

When printing from Word 2010 I found that it would say "connecting to printer" for ages... I was only printing one page of text!

Solution 1 (maybe)
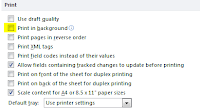
On one website it said to turn off the background printing, I tried this but it didn't help me. Maybe it'll work for you, here's what to do:
Click File | Options | Advanced
Scroll down to the Print section
Turn off Print in Background (see the screen shot opposite)
Click OK


Solution 2
I downloaded the latest driver for my printer and installed it. I restarted my computer and now Word is printing normally again. Sometimes the simplest solutions are the best!

29 Nov 2009

HTC Hero mobile data settings (Swisscom)

If you switch on Mobile Data but your HTC Hero doesn't connect to the G3, Edge nor GPRS networks, you should check 'Access Point Names' settings. In Switzerland, if you are using an HTC Hero phone with a Swisscom contract, here's what you should do:

Settings | Wireless & Networks | Mobile networks | Access Point Names

Press the Menu button and add a new APN as follows:

Name : Swisscom
APN : event.swisscom.ch
Proxy :
Port :
Username :
Password :
Server :
MMSC : http://mms.natel.ch:8079
MMS proxy : 192.168.210.002
MMS port : 8080
MCC : 228
MNC : 01
APN type :


Reference