Showing posts with label Windows 10. Show all posts

30 Dec 2020

PDFtk - how to fix blurred text

PDFtk is a great little app for merging PDF files. Since I started using Windows 10 I found that when using PDFtk the text on the app was a little blurred and difficult to read. Here's a screen shot:


Do you see what I mean? It's ok, I can use it but it's not pleasant. 


Solution
Click search (magnifying glass icon) next to Start

Type PDFtk 

Right click on the PDFtk app in the Start menu

Click Open file location

On the PDFtk shortcut, right click, click Properties

Click Compatibility (see the screen shot below)


Click Change high DPI settings


Enable Override high DPI scaling behaviour

Set the scaling to Application

Click OK


When you next open PDFtk it'll look much better:


It makes a very noticeable difference! 


Conclusion
I presume that the scaling technology changed with Windows 10 and some applications have not been updated to use it. But as you can see, using this compatibility setting it's possible to improve how the fonts appear. 

This isn't only for PDFtk, you can also try this for other applications that have blurred text. You might need to experiment with the settings but you should be successful. 

I hope this has helped :-) 


26 Sept 2020

Windows 10 Emojis

At any time, nearly anywhere in Windows 10, if you want to add an emoji, perhaps a smiley or an arrow, whatever, there's a really easy way to do it:

Press the Windows key and dot "." at the same time!

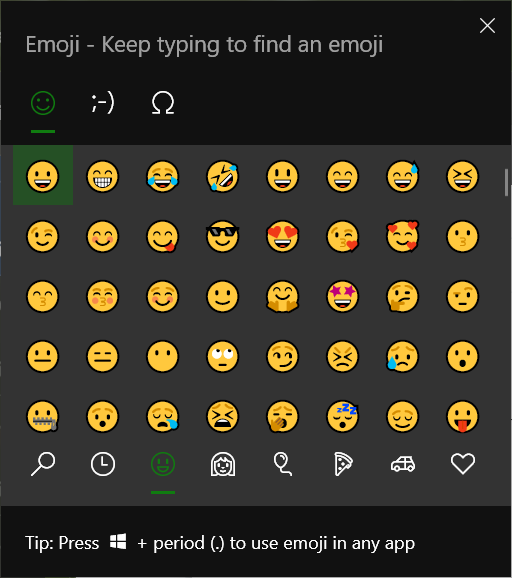
Here's what you'll see. At the top you'll notice three categories, a smiley, a text smiley and a symbol:


For each of those categories there are sub-categories at the bottom of the window. There's a lot to explore!

To add an emoji to your current application at the cursor, click the emoji you want. 

Here's that smiley you see in the above screen shot: 😀
Here's a computer emoji inserted directly into this blog article: 💻


Sometimes emojis look different
Here's an example of how an emoji appears in Gmail:


Below I inserted the same smiley into Notepad:


There's a difference, in Notepad (and therefore plain text) we see a monochrome version of the emoji. Emojis will usually appear the same but sometimes, depending on the application you are using, their appearance may vary. These emojis are standard in the unicode character set but it depends on how applications interpret them. If you are working on something important, I would recommend you test before publishing the final version.

For example, I have tested with Adobe Experience Manager (for intranet pages) and most emojis appear correctly. However, some don't have the same colour. There's a phone emoji that's red but appears black, odd things like that. You'll have to experiment. 

Emojis may also appear different on other platforms, like on Android, iOS or Linux for example. For example, I found when viewing the icons on a Windows 7 PC, the icons appear but are black and white. I've not systematically tested myself but what do you see when you view these emojis? Do they appear correctly compared to the screen shots I've included here?
😀😁😂🤣😃😄😅😆


Another example


The above is me selecting the man technologist 👨‍💻. It's nice they all have names. This is important because you can search for them by clicking the magnifying glass icon and typing. Type "man" for example, this one will appear in a short list.


Symbols
I think the symbols are also useful, to get to symbols, at the top I clicked Ω


This has lots of useful symbols. At the bottom click $, it shows all currency symbols. Click Ç you have accented characters - useful if you need to write in another language but you don't want to switch keyboard layouts.  


Conclusion
It's a really nice feature. There are many emojis included, perhaps too many for this little window they provide and the vertical scroll bar that means there's a lot to look through. But of course once you get used to it and where to find your favourites, it's fine. There is a Recently used category, the clock bottom left 🕒.


4 Feb 2020

Windows 10 - Clipboard History

Normally every time you copy something to the clipboard (press Ctrl-C) it overrides the previous thing you copied. However, in Windows 10 you can turn on a feature called Clipboard History where it stores each clipboard copy (each time you press Ctrl-C).

First you'll need to turn on this feature:

Click Start, Settings (the gear icon)
Type "clipboard" and select Clipboard Settings


Near the top you'll see Clipboard history - click to enable it (turn it on)

Now press Windows Key and V and you'll see the following:


Here's an example of it in use. I have Notepad open, I wrote two lines and copied them separately. I pressed Windows Key and V and I can see the two copied pieces of text. They are stored separately in my clipboard. I can reuse each piece of text individually. 


Windows 10 - Add clocks for different time zones

Are you working with colleagues around the world, in different time zones? Windows 10 has a feature where you can have two additional time zones added to your Windows clock (bottom right corner). Here's how to do it:

Click the clock in the bottom right hand corner
Click Date and time settings


Click Add clocks for different time zones

The following dialogue box will appear:


Click Show this clock and select a time zone 
You can also name the clocks. In my example above I've put Nairobi and Bangkok.

From now on when you mouse over the click you'll see your local time plus the two additional time zones you've set:


Also when you click on the time you'll see the usual calendar plus the additional time zones shown again. It's a shame we can't add more than two time zones but at least we have this! 


NOTE: This is not a new feature with Windows 10. It was available on Windows 7 too. 

30 Jan 2020

Windows 10 - Multiple desktops!

There's a great feature of Windows 10 where you can have a second, third or more desktops. I wonder how many people are using it because I don't think it's such an obvious option. It could be very helpful, especially if you often have many windows open at once. For example, if you want to have Outlook open all the time plus a browser window. You can of course Alt-Tab between those but maybe you have lots and lots of e-mails open, that could make a lot of windows and a lot of clutter!

The multi-desktop feature allows you to have two or more desktops. Not for a place to put more icons, in fact it is still just one desktop. It's just that you have multiple views of the desktop. In the scenario of Outlook and a browser, you could open Outlook on one desktop and your browser on the other. It just limits the amount of windows you have to deal with at one time. You are limiting your clutter so to speak. Here's how to do it:


Click the Task View icon (to the right of the search box)

If you don't have the Task View button right click on the Taskbar and click Show Task View button

Click New Desktop (assuming you don't have Desktop 2 yet)

Click Desktop 2 

Whatever you open on Desktop 2 will be seen only from there. If you switch back to Desktop 1, it'll be as before. Try it, you'll see!

Add even more desktops by clicking New Desktop again.

To change desktop, just click the Task View icon again. An alternative is to press Ctrl-Win-arrow key (left or right).


Settings
By default Alt-Tab will cycle only through the windows you have open in the current, selected Desktop. However, if you want to change this, open Settings and search for "Multi-tasking", near the bottom of the screen you can change this setting under the sub-heading "Virtual Desktops".


26 Jan 2020

Windows 10 File History - backup your files!

Your documents, pictures, videos and other personal files are the most valuable thing you have on your computer. What if those files were destroyed? Perhaps your laptop's disk drive will die or you accidentally delete (and empty your recycle bin) an important file?

You need to backup your data. But that's boring right? You are tired, you don't want to continually mess around with complicated backup procedures? You don't need to!

Windows 10 has a great feature called File History. Periodically (you decide when) it copies your files to another drive. Best of all, it keeps versions of files. For example, update a file on Monday, Tuesday and Wednesday. Later you realise that the change you made on Wednesday was a mistake. With File History you can restore the file from Monday or Tuesday. Because File History works in such a seamless and simple fashion, I recommend it.

File History is what I term a "file backup" tool. You shouldn't only have this backup, you should have other methods of backing up too if you want comprehensive protection against data loss. Please click here for more information.


File History Setup
Follow these steps just once per drive to set it up.

Plug-in a USB flash drive or other removable drive. I would recommend 16GB or more, so you have plenty of space available. Make sure the drive is blank, it would be a good idea to format it. You can format to FAT32 or NTFS, either will work.

NOTE: I have set up File History to use a Micro-SD card in my laptop. If you are thinking of doing this it is important to get the right Micro-SD card. Please click here for more information.


In the Windows search box enter "file history"

Click Restore your files with File History

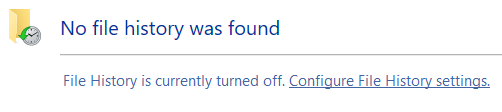
If it's the first time you are using File History you'll see the following (or similar):

 
Click Configure File History

It'll search for a drive to use as the destination. It should see your USB drive - in the example below my USB flash drive is named HISTORY:


NOTE: If it doesn't select the correct drive or you have multiple, on far left click Select drive.

Click Turn on


Click Advanced settings (on the far left)

By default File History will back up your files every hour. You can change this to be more frequent if you wish.


Change the 'Keep saved versions' to Until space is needed

Multiple versions of files are backed up, when ‘Until space is needed’ is set, when the USB removable drive is full File History will automatically reclaim space by deleting the oldest backed up versions.

Click Save changes


Restore
In the search box enter "file history" and click Restore your files with File History. 


  • It's easy to scroll back and forth through history to find your files by date. 
  • Select a file to restore, click the green button - it will restore the file to its original location. 
  • If you want to restore it elsewhere, right click on the green button and click Restore to, a Save As dialogue box will appear, you can select anywhere on your computer to save the restored file.  
NOTE: On this screen if you click the gear icon you can change the set up.


Reset File History
If you format your removable drive and therefore all your backed up files will be gone. But strangely you may see those files if you open File History, but they are just ghosts, they are just the old indexes of the files you used to have backed up. To turn off and reset File History completely, delete the following Configuration folder:
C:\Users\<username>\AppData\Local\Microsoft\Windows\FileHistory\Configuration
The next time you open File History Restore, it will again look for a new removable drive to use.


Considerations
File History will run automatically, there is little to manage. However, remember that when you remove the USB drive the backup will not work. File History works best when you leave the USB drive connected all the time. At the same time, if someone steals your laptop then your backup will be stolen with it. You can remove the USB drive. You can use two USB drives with File History and change them periodically. Keep one in a safe place perhaps. It's also worth considering using File History together with another backup solution, please see here for more help for this.

If you have large amounts of data then it is important to buy a large capacity USB drive. If your laptop has a specific USB 3 port, make sure the USB drive you buy works at USB 3 speed and use that port. Buy a large capacity USB drive to be sure you have enough space for all your backups and versions of files.


Encryption
By default File History will backup files without encryption. If you browse your USB drive you'll find all your files there, you can copy and paste them from the drive if you wish. This is an advantage in that you can very easily recover your files. However, it is a disadvantage if someone steals the USB drive. They will have access to your files!

If you are using Windows Home there's nothing you can do. Windows Home does not have BitLocker and therefore it cannot encrypt the USB drive.

If you are using Windows Professional you have the option to encrypt (password protect) your USB drive. Search for "bitlocker". It works with File History (both are built-in features of Windows 10).


Conclusion
File History works very nicely. The best part is that it's easy to set up and it just works on its own. Very little intervention or upkeep is required. It'll even just keep using your USB drive and recycling the space. 


Disclaimer
I've posted this article to help, it's just my opinion. I take no responsibility for any of your backups or your loss of data. I'm just trying to help out here by explaining this feature.


Related
I have written many other backup related articles, please see them here:
https://mgxp.blogspot.com/search/label/backup


15 Dec 2019

Which MicroSD card should I use in my Dell Inspiron 13 5391?

Recently I bought a shiny new computer, the Dell Inspiron 13 5391. It's a high-spec but reasonably priced laptop (as of November 2019), I'm very happy with it.

The 5391 has a MicroSD card slot. I wanted to use a MicroSD card for backup. I bought a SanDisk Ultra, U1, (10). I have used these cards before, they are inexpensive and a reasonable speed. As I was only backing up files to it, I felt I didn't need more. I plugged this MicroSD card into my 5391 and it appeared as a drive, all appeared normal at first...


Problem
However, when I tried to use it, my computer, in general slowed down. Copying files was like watching a video in slow motion. I tried to set up Windows File History, it gave the error "Could not enable File History". Formatting the card was taking minutes and eventually I had to reboot my PC. I tried the same card in another computer and it read it without problem. I tried the same card in an Android smartphone, it worked fine. I formatted it there. I put it back in my 5391, still the same problem...

I recommend a fast U3 MicroSD card for use with the Dell Inspiron 5391

Solution
I tried another, faster MicroSD card that I already owned. The Toshiba Exceria U3 is a faster card (U3 as opposed to the slower U1) and when I put it into my 5391, it works perfectly! I'm using File History on it without any trouble.


Conclusion
Let's be clear, I am not saying SanDisk don't make good MicroSD cards. I believe my Dell Inspiron 5391 (purchased from Dell Europe) requires a faster MicroSD card. I can tell you for sure that the Toshiba Exceria U3 128GB works. It is very likely that a similar U3 card by SanDisk would also work too. The SanDisk card that I bought, I am currently using it in my Android smartphone without any trouble.

I hope that has helped others who purchase Dell Inspiron 5391 (I have the 13" European model). Pay a bit extra and get a faster card, it's more likely to work!


Reference
  • U3 = 30MB/sec transfer
  • U1 =10MB/sec transfer
The following link explains more about SD cards and their speed ratings:
https://en.wikipedia.org/wiki/SD_card


Disclaimer
Everything I've written here is to the best of my knowledge and experience only. I have not made any extensive tests. I've written this article to help others.


Words for search engines to discover this page:
Dell Inspiron SD card reader problem 
Dell Inspiron SD card reader not working
Dell Inspiron MicroSD reader not working 
Dell Inspiron MicroSD reader problem
Can't read MicroSD card
Dell Inspiron 5000 series
Dell Inspiron 13 5391 MicroSD reader problem