Showing posts with label tip. Show all posts

6 Jul 2025

HP OfficeJet Pro 8610 wireless does not work, can't connect to the printer

All of a sudden, one day you cannot print wirelessly to your OfficeJet Pro 8610 wireless printer - you get this message:
You cannot use the device's wireless function because it has been disabled. For more information, contact your network administrator or the person who set up the device.

It took me a long time to find the answer and then to get it to work was not easy. This is what I did:

Go to the printer's screen

Press the back button four times (this is the difficult part, sometimes it just doesn't work, you have to get the timing right)


Keep trying, eventually you should see this screen:


Select Support Menu


Use the up/down buttons, select Connectivity


Enable the WiFi 

After, the blue WiFi light flashes. Go to the Settings menu, Network Settings, Wireless, use the WiFi wizard, it will search for the network and you can enter your WiFi password. The blue light will stop flashing.


Reference
The following link explains about the 8710 but it's very similar to the 8610 model. It's very helpful, there are even more tips on how to reset the printer too. 

Disclaimer
I was able to fix this issue on an OfficeJet Pro 8610 printer. The steps I've included above may or may not be helpful to you. I am publishing this help here just in case it helps you. I am in no way guaranteeing anything. Whatever you do on your computer, printer or other equipment is at your own risk. I take no responsibility at all. Everything I've written here is in good faith and to hopefully help out someone else.
 

9 Apr 2024

Can't uninstall Microsoft Office?

I recently found I was still using the 32-bit version of Office. I tried to download Office 64-bit but it would not install, it told me I must first remove/uninstall the existing Office 32-bit. Fine I thought, I went to Settings | Apps | Installed Apps. I found Microsoft Office in my list and uninstalled it. When I tried the Office 64-bit installer again, it still complained Office 32-bit was still installed. 


Solution

I downloaded a special Microsoft app called 'Microsoft Support and Recovery Assistant'. You can find it here: https://support.microsoft.com/en-us/office/uninstall-office-from-a-pc-9dd49b83-264a-477a-8fcc-2fdf5dbf61d8

Install and run that application, it will take some time but eventually it does cleanly remove the existing Office installation from the computer. 


27 Mar 2021

Godox TT350 can't adjust the zoom

I noticed that on my new Godox TT350 (O) I could not adjust the zoom setting. The zoom is a number representing the focal length of lens you are using. The zoom will make the flash spread the light more or less. 


In the manual it says to press the Zoom button and use the wheel to adjust the zoom number. This did not work, the number stayed on 14mm (see above screen shot, top right).


Solution
The flash has a pull out catchlight panel and a white card. When this catchlight panel is pulled out for use, the zoom number is forced to 14 and cannot be changed. Check your pull out catchlight panel, make sure it is pushed securely in until it clicks. Then you should be able to adjust the zoom number by pressing the Zoom button and spinning the wheel.


The catchlight panel is protruding a little...


Push the panel down until it clicks in place, it should be flush with the black edge


Press Zoom, spin the wheel (SET) to adjust - in the example it is at 50mm zoom


30 Jan 2021

Grunmods Dune 2000 stutters, freezes or crashes

A few months ago I found Gruntmods Dune 2000. This is a freely available download of the classic Dune 2000 real-time strategy game. I downloaded and installed it. During play sometimes it would just freeze with the sound stuttering. I'd have to switch away and 'End Task'. It got to be quite annoying. 


Solution

Open File Explorer

Browse to C:\Program Files (x86)\Gruntmods Studios\Dune2000


Right click DUNE2000.EXE

Click Properties

Click the Compatibility tab


Change the settings to match the above

Click OK

Now launch Dune 2000 as normal, through the shortcut. All should be well!


Configuration: Video Options
If you search online about this kind of issue many have tips about changing the Video Options in the Dune 2000 Config screen. For me I didn't find this so helpful. My Dune 2000 has been running smooth with the following settings, I'm including the below screen shot just in case it will help you. 


Disclaimer 
I'm sharing my solution and experience in case it can help others, if it doesn't help you I am sorry. I am guaranteeing nothing. Every computer and set up is different, maybe try some of these compatibility settings. If you search online you'll find lots of discussion on this topic, good luck!


30 Dec 2020

PDFtk - how to fix blurred text

PDFtk is a great little app for merging PDF files. Since I started using Windows 10 I found that when using PDFtk the text on the app was a little blurred and difficult to read. Here's a screen shot:


Do you see what I mean? It's ok, I can use it but it's not pleasant. 


Solution
Click search (magnifying glass icon) next to Start

Type PDFtk 

Right click on the PDFtk app in the Start menu

Click Open file location

On the PDFtk shortcut, right click, click Properties

Click Compatibility (see the screen shot below)


Click Change high DPI settings


Enable Override high DPI scaling behaviour

Set the scaling to Application

Click OK


When you next open PDFtk it'll look much better:


It makes a very noticeable difference! 


Conclusion
I presume that the scaling technology changed with Windows 10 and some applications have not been updated to use it. But as you can see, using this compatibility setting it's possible to improve how the fonts appear. 

This isn't only for PDFtk, you can also try this for other applications that have blurred text. You might need to experiment with the settings but you should be successful. 

I hope this has helped :-) 


8 Nov 2020

Sony Android TV connects to the WiFi but not the internet

One day my Sony Android TV (KD‑49XF8096) suddenly stopped receiving anything from the internet. For example, YouTube did not work. 

  • I checked the router (WiFi), all was fine, I could surf the web from my phone and computer.
  • The TV itself was working, it switched on, started up and appeared to work fine, apart from not communicating with the internet. 

One thing occurred, maybe there's a time sync problem? This can be an issue for computers. Let's check the time setting:


Solution

Press Home on the TV remote

Click Settings (gear icon on the top right of the screen)


Click Date & Time

You'll see the data and time setting is by default 'Automatic' and set to use 'Broadcast time'. This is the time from the internet, it should be a good option normally but under some circumstances it can cause this issue.


Click Automatic date & time

Click Use network time

This fixes the problem because 'network time' is the time from the local router (WiFi). This is the first 'hop' in the communication from your TV on its way to the internet. Your router will get the correct time from the internet, therefore all will be well, all the devices will have the correct time and stay up-to-date.

Most importantly, for me this solve the problem, YouTube was working again!


Conclusion
If you've had this issue, I hope this helps you! If not, I'm sorry, I hope you find the solution soon. At least you have ruled out this particular issue from your troubleshooting. 


27 Sept 2020

Outlook - disable e-mail auto-read

By default Microsoft Outlook marks e-mails you click on once, that appear in the preview pane, as 'read'. 

You might not want this behaviour because, perhaps you have access to not only your personal mailbox but also one for the team your work in. Imagine an e-mail comes into the team mailbox, you click on it, you read it in the preview pane. You realise it is not for you. Outlook will mark it read, others in your team might miss it.  

It might be better to take control back from Outlook for you to decide when an e-mail is marked 'read' or 'unread'. This can also be useful for your own e-mails, to help you manage them better perhaps. Here's what to do...


Instructions

In Outlook, click the View menu:


Click Reading Pane (right near the end)

Click Options

Outlook Reading Pane Options

Click to disable (remove the tick) Mark items as read when viewed in the Reading Pane

Click OK


Behaviour

Whenever you click on an e-mail it will not be marked as read. It will remain open/unread. 

  • To mark an e-mail Read, click Ctrl-Q
  • To mark an e-mail Unread, click Ctrl-U

If you double click an e-mail it will be marked Read.


Conclusion

I've been working this way for a couple of months now and I prefer it. At first it was strange but now Ctrl-Q is second nature. I've also found that when I really want to work on an e-mail properly, I do tend to double click it to see it in a separate window. It therefore makes perfect sense that in this circumstance, it is automatically marked Read. 

As we all receive so many e-mails, this is one way we can help ourselves manage them. Of course this method isn't for everyone, I'm just making a suggestion here, it's up to you! Also there are many other tools in Outlook to assist, the Follow Up and Reminder options are excellent and well worth using. It's always best to experiment to find the way of working that feels best for you.


26 Sept 2020

Windows 10 Emojis

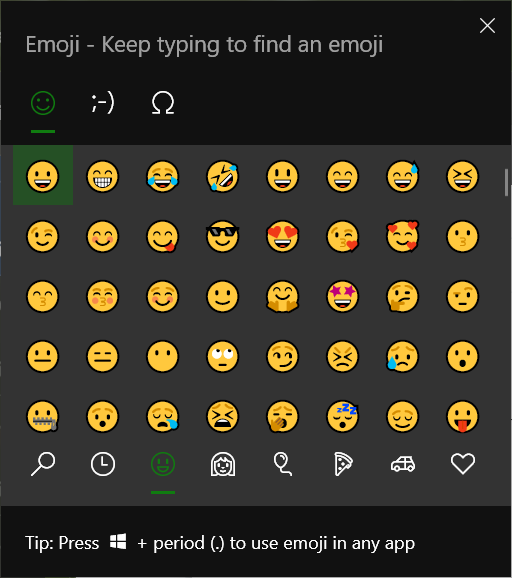
At any time, nearly anywhere in Windows 10, if you want to add an emoji, perhaps a smiley or an arrow, whatever, there's a really easy way to do it:

Press the Windows key and dot "." at the same time!

Here's what you'll see. At the top you'll notice three categories, a smiley, a text smiley and a symbol:


For each of those categories there are sub-categories at the bottom of the window. There's a lot to explore!

To add an emoji to your current application at the cursor, click the emoji you want. 

Here's that smiley you see in the above screen shot: 😀
Here's a computer emoji inserted directly into this blog article: 💻


Sometimes emojis look different
Here's an example of how an emoji appears in Gmail:


Below I inserted the same smiley into Notepad:


There's a difference, in Notepad (and therefore plain text) we see a monochrome version of the emoji. Emojis will usually appear the same but sometimes, depending on the application you are using, their appearance may vary. These emojis are standard in the unicode character set but it depends on how applications interpret them. If you are working on something important, I would recommend you test before publishing the final version.

For example, I have tested with Adobe Experience Manager (for intranet pages) and most emojis appear correctly. However, some don't have the same colour. There's a phone emoji that's red but appears black, odd things like that. You'll have to experiment. 

Emojis may also appear different on other platforms, like on Android, iOS or Linux for example. For example, I found when viewing the icons on a Windows 7 PC, the icons appear but are black and white. I've not systematically tested myself but what do you see when you view these emojis? Do they appear correctly compared to the screen shots I've included here?
😀😁😂🤣😃😄😅😆


Another example


The above is me selecting the man technologist 👨‍💻. It's nice they all have names. This is important because you can search for them by clicking the magnifying glass icon and typing. Type "man" for example, this one will appear in a short list.


Symbols
I think the symbols are also useful, to get to symbols, at the top I clicked Ω


This has lots of useful symbols. At the bottom click $, it shows all currency symbols. Click Ç you have accented characters - useful if you need to write in another language but you don't want to switch keyboard layouts.  


Conclusion
It's a really nice feature. There are many emojis included, perhaps too many for this little window they provide and the vertical scroll bar that means there's a lot to look through. But of course once you get used to it and where to find your favourites, it's fine. There is a Recently used category, the clock bottom left 🕒.


13 Aug 2020

Excel - Compare two tables using COUNTIF

Do you have two tables (lists) in Excel, perhaps one is newer or you suspect it is different? You'd like to compare the two tables and see the differences easily? There are a few ways to do this, here I'm going to show how the COUNTIF function can be used, I've found it to be quick and easy to use.


Example
The following is an example where I have two tables in one Excel worksheet. You could have these tables in different worksheets of course. You also don't need to use Tables, this example would also work with ranges. It's just an example, I hope it is helpful to you:


The tables are named Table1 and Table2.


Table2 has less rows, only 1714 compared to 1718 in Table1. The question is, which rows are missing?


Enter a title to create a new column (above), a new table column will be created (below).


In the first cell in the new column you can enter the COUNTIF() function.


Enter:
=COUNTIF(Table2[Town], A3)

This means that we want look in the Town column of Table2 for whatever is in A3 (Table1). For example, it will look to see whether "Ampthill" is present in Table2 or not.


Because you entered the function into a column in a table, it'll replicate the formula all the way down. As you can see in the above example there is a result in each row of the column 'In Table2?'. COUNTIF() returns the number of times it found what it was looking for. Therefore you can see that on row 20 there's a zero, this means that "Ascot" could not be found in Table2.


Filter
Filters are automatically available for Tables, this makes it easy to see those results that are zero:


Filter the 'In Table2' column for all the zeros (where it did not find anything in Table2).


Enhance the look
For something quick the 0 or 1 is fine. If you want to share this with a others then you could tidy it up. Here's one way to do this:


Change the formula, add the surrounding IF() statement to set a Yes or No result. 
=IF(COUNTIF(Table2[Town], A3),"Yes", "NO!!!")


Having "NO!!!" makes it easier to spot where Table2 is missing this item.


Conclusion
This is just one way to compare data in two tables in Excel. It's nice and quick, I'm sure it can help anyone who just needs to quickly understand which rows are missing from a data set. 

I used the Excel 365 version as of August 2020 for this article. As the COUNTIF function is not new, I am sure this solution will work in older version of Excel too. That's another reasons it's a good choice.


1 Jun 2020

PowerPoint - Turn off Design Ideas

Every time I paste a screen shot or anything into PowerPoint (the 365 version, June 2020) a pane appears to the right titled Design Ideas.

PowerPoint Design Ideas pane

This Design Ideas pane might be of some use but so far it has just been very annoying. It takes up space on the screen, especially when I'm working on a laptop. I don't need this distraction. 


Turn off Design Ideas
The following explains how to switch it off for good:

Click File | Options | General 


Click to disable Automatically show me design ideas

Click OK

If by any chance you do want an design idea from PowerPoint, you can click Design | Design Ideas (right most button on the Design menu).


23 May 2020

How to use a Data API with Excel

A Data API is a way of easily accessing data. The Data API comes in the form of a URL web link. Software applications can use that link to download data. In this article we'll use Excel to download some data using a free Data API. 


Example scenario
I would like a list of all the countries in the world and their 3-digit ISO codes. I might want to use this information to combine with my own data for analysis. I could of course go to Wikipedia and download the list but that would be a static list. What if any of the data is updated in the future? It would be great if I could click Refresh and get the latest information. This Data API will allow me to do that.

The following website provides a free Data API for country information:
We'll use this Data API for our example here but there are many different Data APIs available. 


Instructions
In Excel click Data (menu tab)


Click From Web (or click Get Data | From Web)


Enter the Data API URL. In our example we'll retrieve only two fields of data; the country name ("name") and 3-digit ISO code ("alpha3Code"): 
https://restcountries.eu/rest/v2/all?fields=name;alpha3Code

NOTE: More data fields can be retrieved, just add a semi-colon and the field name. We will explore this more, later in this article.

Click OK and Power Query opens...


On the Transform tab click To Table


Click OK


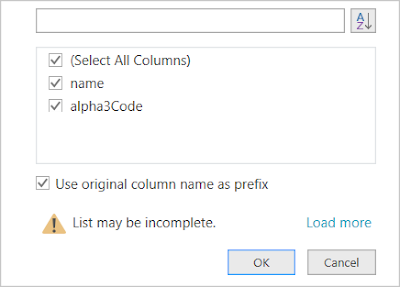
In the Column click the <-> icon (as shown above)


Click OK

Now you'll see the data in Power Query Editor:


Click Close & Load

A table will appear in your workbook:


The table is like any other Excel table. Use the data whichever way you like. 

Click Refresh to update/fetch the data from the Data API. 


More fields
The Data API URL from restcountries.eu can be modified to give more data. In principle this is how other Data APIs work too. Near the end of the URL it says fields=. The field names are listed with semi-colons to separate them. 

To fetch the country name and ISO code:
https://restcountries.eu/rest/v2/all?fields=name;alpha3Code

To fetch the country name, ISO code and capital city:
https://restcountries.eu/rest/v2/all?fields=name;alpha3Code;capital

To fetch everything in this data set:
https://restcountries.eu/rest/v2/all
Remember that the more data you retrieve, the slower it will be. Always try to restrict your request to the data you need.

TIP: If you want to test a Data API, paste the URL into your browser. If it's working you'll see all the data displayed (although difficult to read!). 


Excel version
I used Excel 365 (May 2020) in this example. However, it is likely older versions of Excel will work the same way or similar. Feel free to write comments below to help others.


Conclusion
Like many things this is easy once you know how. There are many public data sources available, just do a search and and you'll find many, sometimes free like the one here, others free but you must register (you need an ID to access the Data API) and others where you must pay (subscribe to a service). Of course you might also use this to easily access your own corporate data - ask your IT department! 

The best thing about Data APIs is that they can be updated easily and they are pretty easy to set up. I hope this article has been helpful, at least to get you started. 

If you want to learn more about APIs, have a look at this video, it's pretty good for beginners:


Disclaimer
The Data API I used here as an example, it is just that, an example. I have no affiliation with that Data API site. I just used it because it was free to the public and had data that was good for this demonstration. If you find errors in the data please address any issue to that website and not to me. Everything I have written here is without guarantee, I'm just trying to help with this article :-)


5 May 2020

Microsoft Teams - add your own background to your video conference

Copy your own JPG files to the following folder and they'll appear in the list of backgrounds available for your Teams conference call!
%APPDATA%\Microsoft\Teams\Backgrounds\Uploads


Instructions
Open File Explorer

Copy and paste:
%APPDATA%\Microsoft\Teams\Backgrounds\Uploads
Into File Explorer, as shown above.

Copy your JPG background files to the Uploads folder. 

The next time you are in Teams having a meeting, click the [...] button, click Show Background Effects, scroll to the bottom of the backgrounds - you will see the image(s) you have added to the Uploads folder. 

25 Apr 2020

HTML - Preserve text formatting such as paragraph breaks

In HTML when you want to display text generally the paragraph <p> tag is used. However, if the text you wish to display has spaces between paragraphs (carriage returns), using <p> will remove those, making your text look like just one long string of words - ugly!

The solution is to use the <pre> tag instead of <p>. The <pre> will retain any basic formatting. 

For example:

Using <p>


Appears in a browser as follows:


Using <pre>


Appears in a browser as follows:


Conclusion
Using <pre> allows the text to appear as it was originally written. This can be very useful, especially if you are parsing text from one source to another and wish to display that text in a browser.

But it's important to realise that <pre> takes care of basic formatting, it doesn't handle rich text. It's just the spacing and line breaks (carriage returns). If you have more sophisticated source formatting you'll have to look at more sophisticated solutions such as CSS.


References
More details here:
https://www.w3schools.com/tags/tag_pre.asp


13 Apr 2020

Excel - Abbreviate huge numbers

Are you often working with very large numbers, possibly hundreds of thousands or even millions? Those numbers can become very long and difficult to read. There's an easy way to format them in Excel so they appear abbreviated. For example, 100,000 would appear as 100K. Here's what to do:


In the above example we have a couple of huge numbers. Select both cells, right click and click Format Cells.


Click Custom

Enter:
[>999999]#,,"M";#,"K"

Click OK

Now the numbers will appear abbreviated:


If you use pivot tables, this is invaluable. You can format the measures (Values) to be abbreviated just as above. Click the down arrow on the measure in the Values box, click Value Field Settings, click Number. This brings up the Format Cells window. Add the Custom template as explained above. Whenever you use that particular measure all the numbers will be formatted with this abbreviated format.