For anyone with a very long Word document and lots of text that have hyperlinks (URLs) attached, it is very difficult to keep those links up-to-date. Periodically you have to check they are correct. You can of course browse the document and hover your mouse pointer over each link but that is a very slow solution.
Instead, with your document open in Word, press Alt-F9. Lots of codes will be revealed. Press Alt-F9 a second time to hide them.
Here's a simple example:
In the above example the second sentence is hyperlinked. A URL is behind that link, but what could it be?
Press Alt-F9 and you will see it:
As you can see, it's inline, this should help you verify your links.
It's just a view, if you press Alt-F9 again the hyperlink will no longer be visible.
Showing posts with label Word. Show all posts
13 Feb 2020
Word - view hyperlinks within your document (Alt-F9)
3 Oct 2018
Microsoft Word has stopped working - error when editing an existing document
I opened an existing Word document and edited the footer. I just typed some letters and bang - I got a message Microsoft Word has stopped working and then I have to close Word!
I tried several times including using the recovery option and I continued to have this issue. It was really annoying because I hardly typed anything before Word would crash and the document was only two pages so hardly anything to tax Word or the computer's resources.
I tried repairing my Office 2013 but this did not help me. I searched online and found some articles, here's one that was particularly clear and helpful:
https://www.online-tech-tips.com/ms-office-tips/fix-microsoft-word-has-stopped-working/
However, it didn't help me, my problem persisted!
Solution
Instead of double clicking the Word document from Windows/File Explorer I tried opening it from within Word (File | Open). This did not help. Then I realised there was a repair option when you open the document - I tried this and it worked for me! Here's exactly what to do:
In Word click File | Open
Click Computer and Browse to where you have stored the document
Select the document you wish to open - but don't open it, look at the bottom right of the window:
I tried several times including using the recovery option and I continued to have this issue. It was really annoying because I hardly typed anything before Word would crash and the document was only two pages so hardly anything to tax Word or the computer's resources.
I tried repairing my Office 2013 but this did not help me. I searched online and found some articles, here's one that was particularly clear and helpful:
https://www.online-tech-tips.com/ms-office-tips/fix-microsoft-word-has-stopped-working/
However, it didn't help me, my problem persisted!
Solution
Instead of double clicking the Word document from Windows/File Explorer I tried opening it from within Word (File | Open). This did not help. Then I realised there was a repair option when you open the document - I tried this and it worked for me! Here's exactly what to do:
In Word click File | Open
Click Computer and Browse to where you have stored the document
Select the document you wish to open - but don't open it, look at the bottom right of the window:
Click the down arrow on the Open button (as shown above)
Click Open and Repair
The document opens and you may edit it, it should not crash!
Click File | Save As, replace the old document with this new one.
Conclusion
The Open and Repair option worked for me. I hope it helps you but if not try the link I included above, there were other ideas there that might help you. Good luck!
NOTE: In the above example I was using Windows 7 and Word 2013.
3 May 2018
Recover an unsaved document
Imagine you create a new Word document, you write for a couple of hours and you were so absorbed in what you were writing that you forgot to click Save. Or perhaps you did save it but only once when you started. In the blink of an eye there's a power cut (or a similar calamity), your computer switches off! After all that work, oh no, it's lost forever!
Don't panic! In fact Word (and other Microsoft Office applications) periodically saves your work for you, even if you've not saved and named your file. This article explains how you can recover your document and breath easily again.
Instructions
In Word click File | Open
You'll also notice in the above Options screen that the path to the AutoRecover file is shown. You can change this if you wish but I recommend you leave it as it is.
Other File Recovery Solutions
There are many other situations where files may be deleted accidentally or where your hard disk might die, etc. I've written some other articles that may help you:
If you delete a file but you can't recover it from the Recycle Bin, there still might be a chance you can find a shadow copy in System Protection:
https://mgxp.blogspot.com/2016/11/system-protection-shadow-copy-recover.html
A general article about backing up your files on a Windows computer:
https://mgxp.blogspot.com/2017/04/windows-pc-backup-strategy.html
Also take a look at Recuva - this is a free tool for un-deleting files, it's worth a try:
https://www.ccleaner.com/recuva
Conclusion
It's a scary moment when you realise you've lost your work but modern software has a few safeguards that can help you out. However, please try not to rely to heavily on the computer to do this for you. It's still much better to click save or even Save As (make multiple copies) just to be sure all will be well. I also cannot stress enough how important backups are. Even copying a file to a USB flash drive or to the cloud (Google Drive, OneDrive, etc) should be part of your usual workflow. Don't take chances. But if all else fails Word does have your back!
Disclaimer
You are responsible for your files and how you use your computer. If the above steps do not help you, I am sorry but there's nothing I can do. My article here is just to assist you, to provide some information. I cannot be held responsible for any loss of files, always backup and take care!
Don't panic! In fact Word (and other Microsoft Office applications) periodically saves your work for you, even if you've not saved and named your file. This article explains how you can recover your document and breath easily again.
Instructions
In Word click File | Open
At the bottom of the Recent Documents list, click Recover Unsaved Documents
By default all unsaved documents (.asd) can be found here:
C:\Users\<username>\AppData\Local\Microsoft\Office\UnsavedFiles
Word will show you this folder location:
You can select a file you wish to recover and click Open
That's it!
NOTE: The above example was with Word 2013 but other versions from 2010 onward should work fine. Also, the above will work for other Office applications such as Excel and PowerPoint.
Options
You can control how the Word auto-save function works. Click File | Options | Save
In the top part of the screen you can set the AutoRecover frequency, by default it is every 10 minutes. If you are a cautious person, perhaps change this to every 5 minutes.
You'll also notice in the above Options screen that the path to the AutoRecover file is shown. You can change this if you wish but I recommend you leave it as it is.
Other File Recovery Solutions
There are many other situations where files may be deleted accidentally or where your hard disk might die, etc. I've written some other articles that may help you:
If you delete a file but you can't recover it from the Recycle Bin, there still might be a chance you can find a shadow copy in System Protection:
https://mgxp.blogspot.com/2016/11/system-protection-shadow-copy-recover.html
A general article about backing up your files on a Windows computer:
https://mgxp.blogspot.com/2017/04/windows-pc-backup-strategy.html
Also take a look at Recuva - this is a free tool for un-deleting files, it's worth a try:
https://www.ccleaner.com/recuva
Conclusion
It's a scary moment when you realise you've lost your work but modern software has a few safeguards that can help you out. However, please try not to rely to heavily on the computer to do this for you. It's still much better to click save or even Save As (make multiple copies) just to be sure all will be well. I also cannot stress enough how important backups are. Even copying a file to a USB flash drive or to the cloud (Google Drive, OneDrive, etc) should be part of your usual workflow. Don't take chances. But if all else fails Word does have your back!
Disclaimer
You are responsible for your files and how you use your computer. If the above steps do not help you, I am sorry but there's nothing I can do. My article here is just to assist you, to provide some information. I cannot be held responsible for any loss of files, always backup and take care!
29 Jun 2017
Outlook - Change text between upper, lower and mixed case
Sometimes when writing an e-mail in Outlook I would like to change the case of my text. For example, recently I was listing usernames and they were all lower case. Sometimes there were typos (often due to Outlook's auto-correct) so if I could select those words and force them to lower case, that would be great.
Menu
In Outlook 2013 click the Format Text menu and the Aa button:
Keyboard
Even more useful than that, you can use the shortcut Shift-F3:
Shift-F3 works in Outlook, Word and Powerpoint. I have tested with Office 2013, it is likely to work in other versions of Office, older and newer. Try and write in the comments what you discover.
Shift-F3 doesn't work in Excel. Shift-F3 in Excel is to insert a function.
Menu
In Outlook 2013 click the Format Text menu and the Aa button:
Keyboard
Even more useful than that, you can use the shortcut Shift-F3:
Shift-F3 doesn't work in Excel. Shift-F3 in Excel is to insert a function.
22 Jan 2017
Add a custom colour to your default colour palette in Word and other Office applications
I'm currently using Office 2013 and there's a colour I use often in my documents, it isn't the usual blue, it is different from any of the blues provided with the Office applications. To get this special blue I have to add it as a custom colour using the colour code RGB 0, 144, 188. But I have to do this every time I open Word, for example.
After entering my custom colour it is shown at the bottom of the window in the Recent Colors, so I can quickly select it. However, when I close and reopen Word, my custom colour has gone. I have to enter the custom colour every time I start Word. It's the same story for the other Office applications.
I would like to have my custom colour available for all new documents I create. This can be very important, imagine your company has it's own corporate colours, shouldn't they be available to everyone as part of the standard colour palette? It's a bit much to expect user to enter custom colours using RGB codes for every document. Having the colours available easily will make the adoption of the correct colours much easier.
NOTE: I'm using Office 2013 / Word 2013 in my example here, in other versions you may find some differences but I hope at least this will help you find your way.
Solution for Word 2013
In Word, click File, New and Blank Page (or the template you would like to add your custom colour to)
Click Design
Hover the pointer over Colors to see which theme you are currently using - as in the example below:
In the above example I am currently using the Office theme.
Click Colors
Click Customize Colors (at the bottom of the drop-down list)
On the ‘Create New Theme Colors’ window, select one of the preset colours, in my example I will change Accent 5 because it is already close to the custom colour I want to add.
Click More Colors
Click the Custom tab
Enter the colour you would like, in my example RGB 0, 114, 188
Click OK
In the Name box change Custom 1 to the theme name that you’d like, in my example “Corporate Colours” and click Save.
Now your new colour is accessible for the current document (you can see it at the top of the menu - above). However, if you’d like it to be available for all new documents using this template, on the Design tab...
...and click Set as Default.
Here's what it looks like to actually use it:
Outlook 2013
Once you've created a new Colour Theme in one Office application, it'll show up in other applications. For example, when I am composing an e-mail the same colours will be available. In the screen shot below you can see the Options menu where the Colors menu is located.
Excel 2013
As with Outlook, the same is true but look on the Page Layout tab for the Colors option.
Powerpoint 2013
It is a little different here, go to the Design tab. Click the expand button on the 'Variants' box:
There is the usual Colors option to select from.
Deploy to other computers
I am sorry but I have not done this myself so I cannot provide a full explanation here. However, I did discover that the new Colour Theme I created and named "Corporate Colours" in Word, was stored as an XML file like this:
C:\Users\<username>\AppData\Roaming\Microsoft\Templates\Document Themes\Theme Colors\Corporate Colours.xml
I copied the Corporate Colours.xml file to the same folder on another computer with Office 2013. I opened Word, clicked Design, looked on the Colors button and yes, my Corporate Colours option was there at the top of the list. This means you could distribute this file to all workstations on your network to provide the corporate colours to everyone.
I also found the following page on the subject, using Group Policies:
https://technet.microsoft.com/en-us/library/cc178992(v=office.15).aspx
I hope that helps!
Conclusion
If you are using a particular colour often, this really is a great little time saver. If you are using a whole palette of colours, perhaps a corporate colour scheme - this is essential. I say essential because expecting users to enter RGB numbers is a lot to ask them. They will make mistakes or forget. Customising the colours available in Office applications is best and as you can see here, it is not difficult.
Reference
Microsoft Office Change a Theme
https://support.office.com/en-us/article/Change-a-theme-and-make-it-the-default-in-Word-or-Excel-c846f997-968e-4daa-b2d4-42bd2afef904
Deployment
https://technet.microsoft.com/en-us/library/cc178992(v=office.15).aspx
Deploy templates
http://www.thewindowsclub.com/custom-templates-installation-location-office
After entering my custom colour it is shown at the bottom of the window in the Recent Colors, so I can quickly select it. However, when I close and reopen Word, my custom colour has gone. I have to enter the custom colour every time I start Word. It's the same story for the other Office applications.
I would like to have my custom colour available for all new documents I create. This can be very important, imagine your company has it's own corporate colours, shouldn't they be available to everyone as part of the standard colour palette? It's a bit much to expect user to enter custom colours using RGB codes for every document. Having the colours available easily will make the adoption of the correct colours much easier.
NOTE: I'm using Office 2013 / Word 2013 in my example here, in other versions you may find some differences but I hope at least this will help you find your way.
Solution for Word 2013
In Word, click File, New and Blank Page (or the template you would like to add your custom colour to)
Click Design
Hover the pointer over Colors to see which theme you are currently using - as in the example below:
In the above example I am currently using the Office theme.
Click Colors
Click Customize Colors (at the bottom of the drop-down list)
On the ‘Create New Theme Colors’ window, select one of the preset colours, in my example I will change Accent 5 because it is already close to the custom colour I want to add.
Click More Colors
Click the Custom tab
Enter the colour you would like, in my example RGB 0, 114, 188
Click OK
In the Name box change Custom 1 to the theme name that you’d like, in my example “Corporate Colours” and click Save.
Now your new colour is accessible for the current document (you can see it at the top of the menu - above). However, if you’d like it to be available for all new documents using this template, on the Design tab...
...and click Set as Default.
Here's what it looks like to actually use it:
Outlook 2013
Once you've created a new Colour Theme in one Office application, it'll show up in other applications. For example, when I am composing an e-mail the same colours will be available. In the screen shot below you can see the Options menu where the Colors menu is located.
Excel 2013
As with Outlook, the same is true but look on the Page Layout tab for the Colors option.
Powerpoint 2013
It is a little different here, go to the Design tab. Click the expand button on the 'Variants' box:
There is the usual Colors option to select from.
Deploy to other computers
I am sorry but I have not done this myself so I cannot provide a full explanation here. However, I did discover that the new Colour Theme I created and named "Corporate Colours" in Word, was stored as an XML file like this:
C:\Users\<username>\AppData\Roaming\Microsoft\Templates\Document Themes\Theme Colors\Corporate Colours.xml
I copied the Corporate Colours.xml file to the same folder on another computer with Office 2013. I opened Word, clicked Design, looked on the Colors button and yes, my Corporate Colours option was there at the top of the list. This means you could distribute this file to all workstations on your network to provide the corporate colours to everyone.
I also found the following page on the subject, using Group Policies:
https://technet.microsoft.com/en-us/library/cc178992(v=office.15).aspx
I hope that helps!
Conclusion
If you are using a particular colour often, this really is a great little time saver. If you are using a whole palette of colours, perhaps a corporate colour scheme - this is essential. I say essential because expecting users to enter RGB numbers is a lot to ask them. They will make mistakes or forget. Customising the colours available in Office applications is best and as you can see here, it is not difficult.
Reference
Microsoft Office Change a Theme
https://support.office.com/en-us/article/Change-a-theme-and-make-it-the-default-in-Word-or-Excel-c846f997-968e-4daa-b2d4-42bd2afef904
Deployment
https://technet.microsoft.com/en-us/library/cc178992(v=office.15).aspx
Deploy templates
http://www.thewindowsclub.com/custom-templates-installation-location-office
3 Nov 2016
Outlook 2013 - when composing a message clear text formatting
In MS Outlook 2013 often when I am writing an e-mail I copy and paste some text from a different source. Often I end up with text that is formatted differently than my message text. The best thing to do is to clear all the formatting for that text. Previously I'd used the red eraser button on the MESSAGE tab to do this but I have just discovered that there's a handy shortcut - press Ctrl-Space.
Example
Click the red eraser button or
Press Ctrl-Space
The above is the result, it's your default font and formatting.
NOTE: It will not clear highlighting from text.
Versions
Ctrl-Space works with Outlook 2013 and Word 2013. I haven't tried it with other versions of Outlook and Word but it is likely to work with them too. In Excel Ctrl-Space selects a column.
Example
Select the text...
Click the red eraser button or
Press Ctrl-Space
The above is the result, it's your default font and formatting.
NOTE: It will not clear highlighting from text.
Versions
Ctrl-Space works with Outlook 2013 and Word 2013. I haven't tried it with other versions of Outlook and Word but it is likely to work with them too. In Excel Ctrl-Space selects a column.
8 Oct 2014
Word experienced an error trying to open the file. Please try the following suggestions
Someone sent me a Word document today, I tried to open it and the following message appeared:
Word experienced an error trying to open the file. Please try the following suggestions
Reason
Word has blocked a file it thinks might be dangerous. In my case it was a macro enabled document (.docm) but it can also be any Word document, possibly sent as an attachment on a 'suspicious' e-mail.
What you must do is ask yourself a serious question:
Is the file from a trusted source?
What you must do is ask yourself a serious question:
Is the file from a trusted source?
- If yes, then proceed.
- Otherwise ask yourself whether you really want to open this potentially dangerous file.
Solution
Thanks to Microsoft's knowledgebase I found the solution and the following worked for me. Here's the short version but of course the full knowledgebase article explains more (I've referenced it below).
WARNING: Only follow these steps if you received the file from a trusted source.
In explorer find the document you wish to open, right click on it, click Properties:
Click Unblock, Apply, OK
Now in Word try File | Open, select the document and it should open normally.
For a full explanation please see the following Microsoft Knowledgebase article:
Version
I'm using Word 2013 but from the article (above link) Word 2010 and 2007 work the same way.
Conclusion
I know I'm only copying what Microsoft's article already says but I thought I'd post this shorter version as it probably works for most people. The Microsoft article goes into more depth about using the Trust Centre so it's well worth a read if you have a more serious issue. The reason for this seems to be that I received a macro enabled doc (.docm) and Word blocked it to protect me. It's just a click to unblock so once you know this it is pretty easy to 'solve'. Feel free to write your experiences in the comments below.
References
15 Aug 2014
Word - Clear personal details from a document
Every time you edit a Word document your username is recorded inside the file. You can see this information by clicking File | Info (Word 2013 and 2010). This can be very useful, you can see the last modified date of the document and more information. However, sometimes you would prefer to remove this data. If you do, follow these steps to clear this data from your Word document. These steps and screen shots are for Word 2013 but they are also very similar for Word 2010 (and maybe even Word 2007).
Instructions
NOTE: Before you start, to be on the safe side, it is recommended that you make a backup copy of your Word document.
Click File | Info
Click Check for Issues | Inspect Document
Click Inspect
Instructions
NOTE: Before you start, to be on the safe side, it is recommended that you make a backup copy of your Word document.
Click File | Info
Click Check for Issues | Inspect Document
Click Inspect
Next to Document Properties and Personal Information click the Remove All button (as shown above)
Your personal data has been removed from the Word document. Save as usual, you are finished.
Just for your reference, the following shows and example of the File | Info screen BEFORE and AFTER removing the personal information on a document.
You can see that the modified dates and names have been removed.
Word Version?
I used Word 2013. I've seen it's also possible in Word 2010.
15 Jul 2014
Word - Change the default Paste behaviour
Introduction
By default when you paste Word will paste with formatting. Sometimes you don't want to do that, you want to paste just the text (no formatting) or you want to merge the formatting of what you are pasting with what you already have in your document. For me I would say that pasting as text is the most useful as it means after pasting I can decide what format I would like to apply, that's what I feel more comfortable with. That's the key really, in Word you can control how pasting works in different ways. I'll show a few of these but it's up to you ultimately how you work and which makes sense to you.
Paste Button
On the Home menu there's a Paste button. It has a number of options, 'Keep Source Formatting', 'Merge Formatting' and 'Keep Text Only'. In the example below I've written "Mary had a little lamb..." and I've added some formatting, I've copied this and one by one I'll show the three paste possibilities:
Keep Source Formatting:
This adds the formatting included in the paste with what's already in your document. Personally I don't use this very often.
Right Click Paste
If you click the right mouse button you'll see the paste options on the context menu. The options are exactly the same as explained above.
Ctrl-V
Position the cursor where you want the text to go and press Ctrl-V. The default paste option will be used. This is 'Keep Source Formatting' unless you've changed the default (explained later in this article).
Paste using the Smart Tag
When you press Ctrl-V a Smart Tag will appear, click it and you have the same options as explained above.
Change the Default Paste option
Click File | Options | Advanced
Scroll down a little, you'll see the 'Cut, copy and paste' section:
Word Version?
Both Word 2013 and 2010.
By default when you paste Word will paste with formatting. Sometimes you don't want to do that, you want to paste just the text (no formatting) or you want to merge the formatting of what you are pasting with what you already have in your document. For me I would say that pasting as text is the most useful as it means after pasting I can decide what format I would like to apply, that's what I feel more comfortable with. That's the key really, in Word you can control how pasting works in different ways. I'll show a few of these but it's up to you ultimately how you work and which makes sense to you.
Paste Button
On the Home menu there's a Paste button. It has a number of options, 'Keep Source Formatting', 'Merge Formatting' and 'Keep Text Only'. In the example below I've written "Mary had a little lamb..." and I've added some formatting, I've copied this and one by one I'll show the three paste possibilities:
Keep Source Formatting:
The first option means that when you paste the text and the formatting will be included. This is the default option which means it's highlighted here initially and also when you press Ctrl-V this is what will happen (this can be changed, keep reading to find out how!).
Keep Text Only:
This one can be very useful, it allows you to paste just the text, with no formatting. If you will decide on the formatting later, this could be the best option.
Merge Formatting:
This adds the formatting included in the paste with what's already in your document. Personally I don't use this very often.
Right Click Paste
If you click the right mouse button you'll see the paste options on the context menu. The options are exactly the same as explained above.
Ctrl-V
Position the cursor where you want the text to go and press Ctrl-V. The default paste option will be used. This is 'Keep Source Formatting' unless you've changed the default (explained later in this article).
Paste using the Smart Tag
When you press Ctrl-V a Smart Tag will appear, click it and you have the same options as explained above.
Change the Default Paste option
Click File | Options | Advanced
Scroll down a little, you'll see the 'Cut, copy and paste' section:
Next to 'Pasting within the same document' you can change Keep Source Formatting to Keep Text Only or Merge. Click OK.
Word Version?
Both Word 2013 and 2010.
20 Jan 2014
Epson Stylus Photo R265 all three buttons flashing
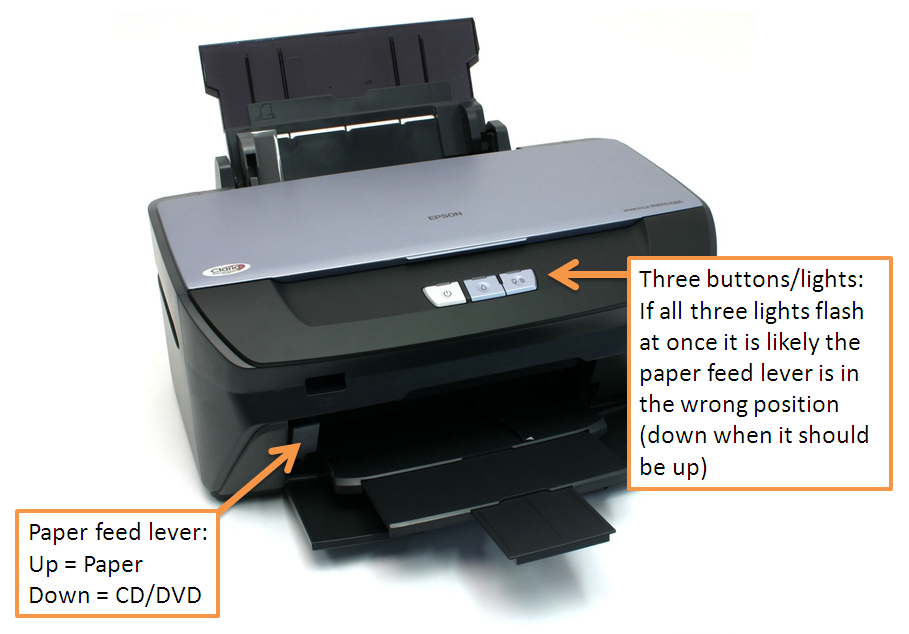
If all three lights on your Epson Stylus Photo R265 (or other similar printer) start flashing, here's what to check:1. Make sure the paper feed lever is up. If it is down then the printer will expect a CD/DVD for printing. If the lever is in the down position then switch off the printer, move it up and switch on the printer again.
2. Check the printer driver properties to ensure it is not set to print to CD/DVD (assuming you want to print to paper).
3. If you are printing from Word check in the Page Setup and ensure paper is set and not the CD/DVD - it should be set to the Default tray. This may seem obvious but I had an experience myself where I opened an old Word document and tried to print it. Previously for sure I'd printed to normal paper but this time all three lights on the printer flashed, I was in trouble! Upon checking Word's Page Setup I found it was set to CD/DVD - very strange. In other words, this is well worth checking, follow the steps below:
a) In Word 2010 click Page Layout
b) Click the Page Setup arrow button - as shown in the above screen shot
c) Make sure your screen looks like the above - Default tray (Sheet)
Reference:
Epson's list of 'flashing light' error codes for the R265 printer:
http://support.epson-europe.com/onlineguides/en/spr265/html/trble_1.htm
18 Nov 2013
Keyboard Shortcuts
I wanted to find a list of keyboard shortcuts for Microsoft Word 2010, after some searching I found this very nice website: http://www.shortcutworld.com/en/win/Word_2010.html

It also has shortcuts for many other applications including Linux and Mac: http://www.shortcutworld.com/
28 Oct 2013
Word 2010 - Unhide Heading 2
In Word 2010 when using one of the default themes, the Heading 2 (and others) is appear to be missing. In fact it's just hidden and any of the standard styles can be un-hidden as follows:
22 Aug 2013
Turn on the Developer tab in MS Office applications
Word, Excel, Powerpoint, Outlook, etc, have some additional features available on the Developer tab (ribbon bar). This tab is not turned on by default. Follow these steps to turn it on:
NOTE: This applies to MS Office 2010 and 2013.
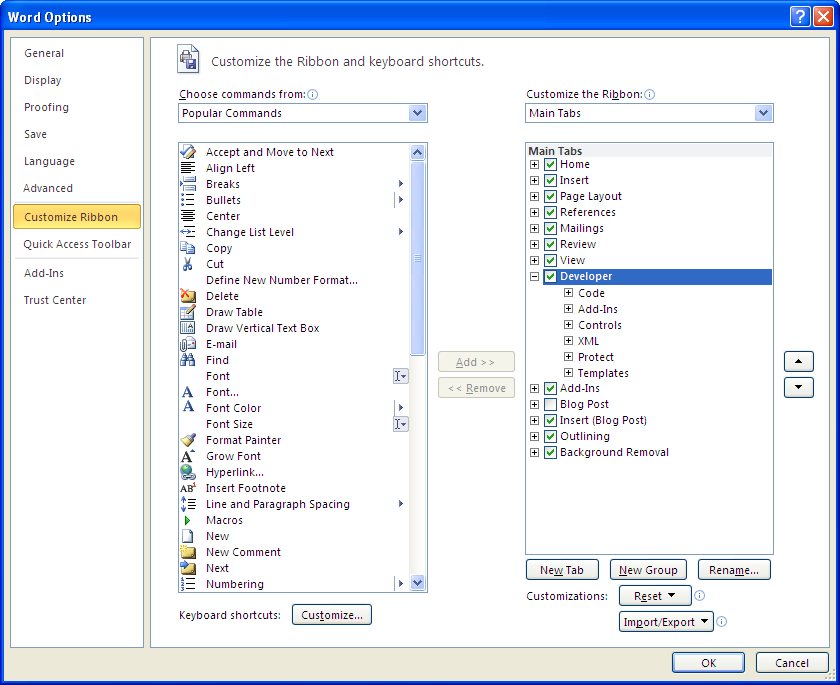
Click File | Options
Click Customize Ribbon
On the right look through the list of Main Tabs and click to enable Developer (as shown above).
Click OK
If you are using Word you'll see the following:
It's similar for Outlook, Excel, PowerPoint and other MS Office applications.
NOTE: This applies to MS Office 2010 and 2013.
Labels:
configuration,
Excel,
Office,
PowerPoint,
tip,
Word
15 May 2013
Word 2010 - Reveal Formatting
Introduction
Sometimes working with a document in Word can be a real pain! Things happen and you just don't understand why. Well of course usually this is because of a style or some other formatting that's crept into your document. The worse situation is when you need to edit a document someone else has created, all manner of odd things can occur.
Solution
Word has a great feature called Reveal Formatting. Here's how to switch it on:
Yes it is that easy!
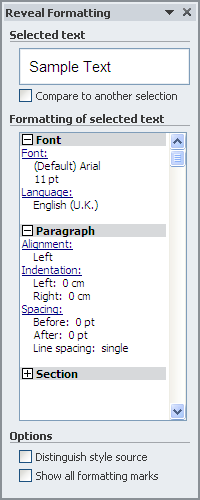
As you can see in the screen shot opposite, the font and other properties of your text is displayed. This can be invaluable in understanding your document.
Also
Instead of press Shift-F1 you can also open the Reveal Formatting window by clicking the following boxes as shown in this diagram:
It's interesting to open it this way because along the way you can see the other tools available to help you work with styles and formatting. the Style Inspector for example, it's very useful when you want to check styles and what additional formatting has been added.
Show/Hide Formatting Marks
This is also very important:
Click
In your document you'll see spaces, tabs, paragraph marks, etc. This helps you see double spacing or where tabs are missing and more.
Conclusion
Don't forget Shift-F1!
Sometimes working with a document in Word can be a real pain! Things happen and you just don't understand why. Well of course usually this is because of a style or some other formatting that's crept into your document. The worse situation is when you need to edit a document someone else has created, all manner of odd things can occur.Solution
Word has a great feature called Reveal Formatting. Here's how to switch it on:
- Select a word in your document
- Press Shift-F1
Yes it is that easy!
As you can see in the screen shot opposite, the font and other properties of your text is displayed. This can be invaluable in understanding your document.
Also
Instead of press Shift-F1 you can also open the Reveal Formatting window by clicking the following boxes as shown in this diagram:
It's interesting to open it this way because along the way you can see the other tools available to help you work with styles and formatting. the Style Inspector for example, it's very useful when you want to check styles and what additional formatting has been added.
Show/Hide Formatting Marks
This is also very important:
Click

Conclusion
Don't forget Shift-F1!
19 Mar 2013
Word 2010 printing is very slow
When printing from Word 2010 I found that it would say "connecting to printer" for ages... I was only printing one page of text!
Solution 1 (maybe)
On one website it said to turn off the background printing, I tried this but it didn't help me. Maybe it'll work for you, here's what to do:
Click File | Options | Advanced
Scroll down to the Print section
Turn off Print in Background (see the screen shot opposite)
Click OK
Solution 2
I downloaded the latest driver for my printer and installed it. I restarted my computer and now Word is printing normally again. Sometimes the simplest solutions are the best!
Solution 1 (maybe)
On one website it said to turn off the background printing, I tried this but it didn't help me. Maybe it'll work for you, here's what to do:Click File | Options | Advanced
Scroll down to the Print section
Turn off Print in Background (see the screen shot opposite)
Click OK
Solution 2
I downloaded the latest driver for my printer and installed it. I restarted my computer and now Word is printing normally again. Sometimes the simplest solutions are the best!
1 Nov 2012
Word 2010 - can't get rid of grey square brackets?
Those grey square brackets [ ] are bookmarks. Possibly they were created automatically when you copy/pasted from another application? Or maybe you added bookmarks yourself but are wondering why the grey brackets are there?
Assuming you'd rather not see the grey square brackets, there are two possible solutions, either delete or hide the bookmarks:
Review/Delete Bookmarks
To review and/or delete bookmarks, in Word 2010 click Insert | Bookmarks. A list of bookmarks will appear, select one and click Delete to remove it.
Show/Hide Bookmarks
To show/hide bookmarks, click File | Options | Advanced | Show bookmarks - as shown below:
Subscribe to:
Posts (Atom)